Medical & Safety Disclaimer: I am sharing my personal methods for managing a home kitchen and extending food shelf life. While these techniques have worked for me, they do not replace official food safety regulations. Always use your senses—smell, sight, and touch—to verify food quality before consumption.
Introduction: The Silent Battle Against Food Waste
For a long time, my kitchen was a place of unintended waste. Every Friday, I found myself performing a “fridge autopsy”—pulling out slimy bags of spinach, wrinkled carrots, and mysterious containers of leftovers that had turned into science experiments. It wasn’t just heartbreaking to see good food go to waste; it was a significant drain on my monthly budget.
I realized that buying high-quality organic food is only half the battle. The real secret to a healthy, cost-effective lifestyle lies in Food Preservation. Over the last two years, I have transformed my kitchen into a high-efficiency system. I’ve learned that by understanding a few scientific principles and adopting simple habits, you can double or even triple the lifespan of your groceries.
This isn’t just about “storing” food; it’s about respecting the ingredients and protecting your family’s health.
1. Understanding the Enemies: Temperature, Moisture, and Gas
Before I dive into specific hacks, I want to talk about the “Three Villains” I learned to fight in my kitchen: Bacteria, Internal Enzymes, and Dehydration.
The Danger Zone: I discovered that bacteria thrive between 5°C and 60°C (40°F – 140°F). I bought a cheap internal thermometer for my fridge and was shocked to find it was sitting at 7°C. I immediately dialed it down to a consistent 3°C (37°F). That small change alone gave my milk and eggs extra days of freshness.
The Ethylene Gas Trap: I used to wonder why my apples made my strawberries go mushy so fast. It turns out that certain fruits are “gas emitters” (Ethylene), while others are “sensitive sleepers.” Keeping them in the same drawer is like putting a loud snorer in a room with a light sleeper.
2. My “Green Thumb” Strategy for Vegetables
Leafy greens were always my biggest challenge. They are delicate and prone to both rotting and drying out.
The “Paper Towel & Air” Balance
I used to keep my lettuce in the plastic bag it came in. By Tuesday, it was brown. Now, I follow a strict routine. I don’t wash my greens until I’m ready to eat them because moisture is the fast track to rot. Instead, I wrap unwashed greens in a dry, thick paper towel and place them in a reusable silicone bag with a tiny bit of air left inside.
The Result: My kale and spinach now stay crisp for up to 10 days instead of three. The paper towel acts as a moisture regulator, absorbing excess dampness while the bag prevents the leaves from wilting.
Why You Should Ditch the Fridge for Certain Roots
I used to think the refrigerator was a “safe haven” for everything. I was wrong. I noticed my potatoes became gritty and sweet, and my onions started sprouting within days.
My Discovery: Cold temperatures turn potato starch into sugar, ruining the texture. Onions need airflow, or they get moldy. I now have a dark, cool “Root Corner” in my pantry. I keep potatoes and onions in separate mesh bags on opposite sides of the room. Since I started separating them, my potatoes stay firm for a month.
3. Proteins: Safety, Portioning, and the “Freezer Burn” Myth
Handling meat and seafood requires the most discipline because the stakes (health-wise) are higher.
The “Flash Freeze” and Portioning Routine
I used to freeze large family-sized packs of chicken breasts. When I wanted to cook just one, I had to thaw the whole pack, which is a massive safety risk.
My System: Now, the moment I return from the market, I spend 30 minutes portioning. I wrap individual portions tightly in parchment paper, then double-bag them in vacuum-sealed bags.
Beating Freezer Burn: “Freezer burn” happens when air reaches the surface of the meat. By removing all the air, I’ve managed to keep steaks looking and tasting fresh for over six months.
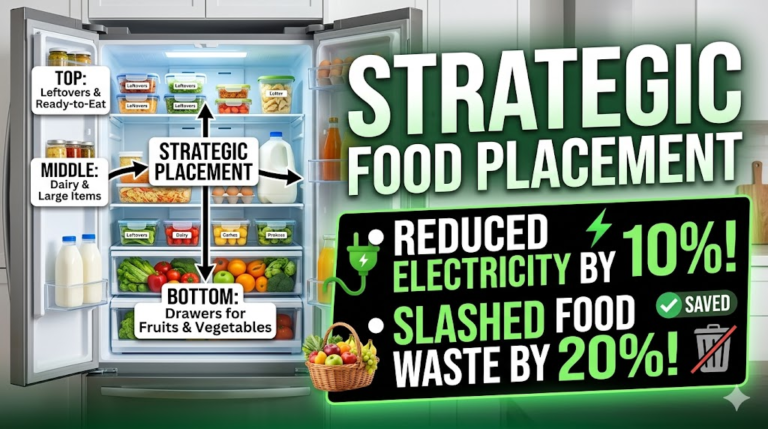
The “Bottom Shelf” Rule
I learned this the hard way after a pack of raw shrimp leaked juice onto my leftover birthday cake.
My Rule: Raw proteins always go on the lowest shelf of the fridge. This prevents cross-contamination and ensures they are in the coldest part of the unit.
4. The “No-Fridge” List: My Biggest Surprises
There are items I used to refrigerate that I now keep strictly on the counter. This was a game-changer for the flavor of my meals.
Tomatoes: Cold air kills the flavor of tomatoes and makes them mealy. I keep them in a bowl on the counter, stem-side down. They taste like they were just picked from the vine.
Honey: I used to struggle with crystallized honey until I realized it never expires and doesn’t need cold. Room temperature keeps it liquid and golden.
Bread: The fridge actually dehydrates bread faster than the open air. If I can’t finish a loaf in two days, I slice it and freeze it immediately. Toasted frozen bread tastes better than “refrigerated” bread every time.
5. Modern Tools: My Experience with Eco-Friendly Alternatives
As I moved away from plastic wrap, I discovered tools that actually worked better for preservation.
The Magic of Beeswax Wraps
I replaced 90% of my cling film with beeswax wraps. Unlike plastic, wax is slightly breathable. I found that wrapping a block of hard cheese in beeswax wrap keeps it from getting that weird “slimy” coating that plastic wrap causes. It’s also antimicrobial, which is nature’s way of helping us out.
Glass vs. Plastic
I transitioned to Borosilicate glass containers. Why? Because plastic is porous. It holds onto odors and oils from previous meals, which can impart a “funky” taste to fresh food. Glass is inert and keeps my pre-cut vegetables much crisper.
6. My Weekly “Power Hour” Prep
The biggest secret to my 2026 kitchen isn’t a gadget; it’s a habit. Every Sunday, I spend two hours on “The Prep.”
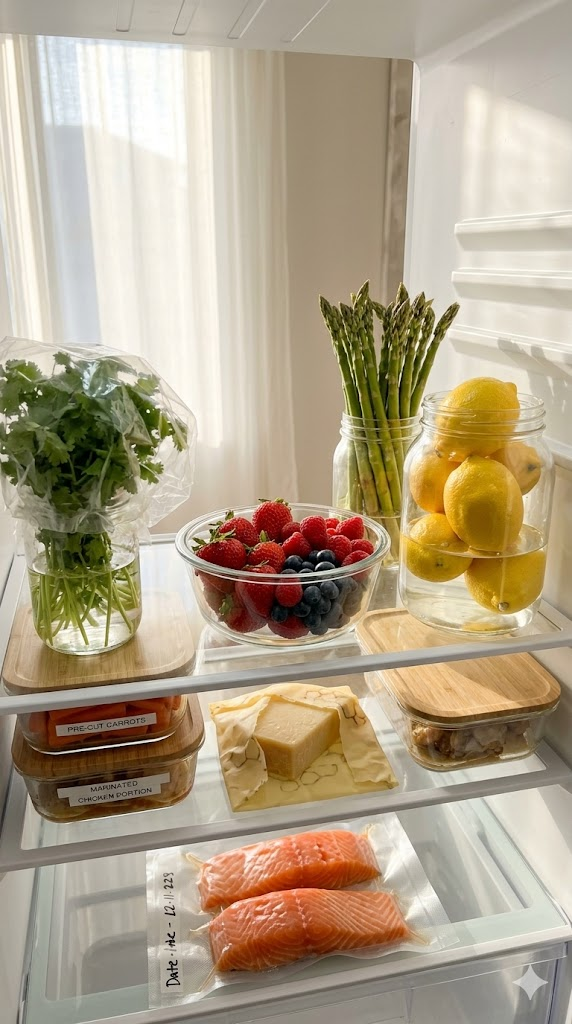
Herbs in Jars: I treat cilantro and parsley like flowers. I trim the stems and put them in a glass of water with a loose bag over the top.
Pre-cutting Aromatics: I chop carrots, celery, and onions and store them in airtight glass jars. This makes weekday cooking fast and ensures these veggies get used before they hide in the back of the drawer.
The “Use First” Bin: I have a clear plastic bin in the middle of my fridge labeled “EAT ME FIRST.” Anything nearing its expiration date goes there. This simple visual cue has reduced my waste by nearly 80%.
7. Deep Diving into Grains and Dry Goods
We often ignore the pantry, but flour and grains can go rancid or attract pests if ignored.
The Freezer Trick for Flour: I learned that whole-wheat flour contains oils that can go bitter. I now store my specialty flours in the freezer.
Airtight is Non-Negotiable: I moved all my pasta, rice, and beans into glass canisters with rubber seals. Not only does my pantry look like a Pinterest board, but I haven’t seen a single pantry moth in two years.
Conclusion: Small Changes, Massive Impact
Perfecting food preservation isn’t about being a scientist; it’s about being an observer. It’s about noticing that your berries stay fresher when you don’t wash them until the last second, or that your lemons last a month when kept in a jar of water in the fridge.
When you master these habits, you stop throwing money in the trash. You start eating better, fresher, and more flavorful meals. My journey from a “fridge gravedigger” to a kitchen manager has been one of the most rewarding shifts in my adult life.
What is the one food item you always end up throwing away? Let’s talk about it in the comments, and maybe I can help you find a better way to keep it fresh!
References & Inspiration:
My personal kitchen logs and waste tracking (2024-2026).
Ethylene gas interaction charts from various agricultural extensions.
Safety parameters for home food storage from the USDA FoodKeepers app.